
Brick Wall Tutorial, straight from the Industrial dream bedroom!

I will admit, when I began this project I did not realize how popular the brick wall would be. I don't have the most amazing photos of the process, but I do have some. So here we go with a quick tutorial on a faux brick wall!
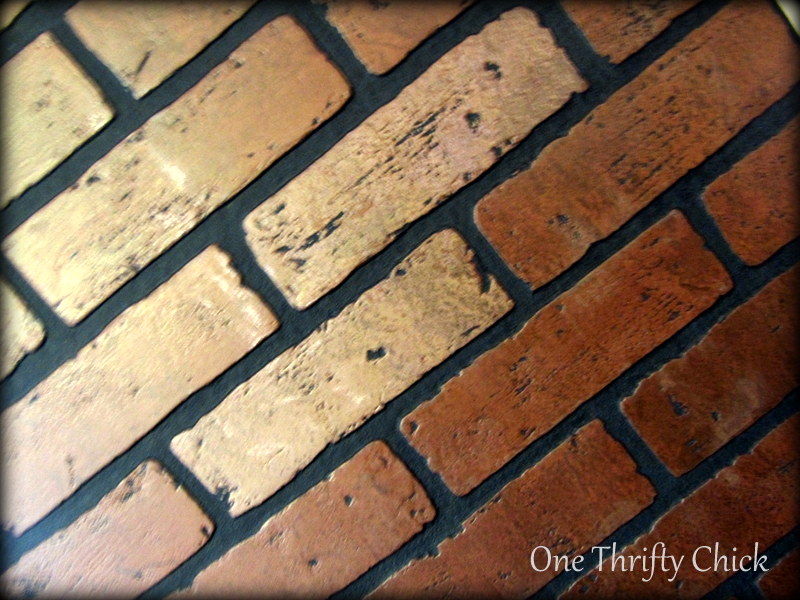
The #1 question has been: Where do I buy this and what is it?
Answer: Lowes Home Improvement store, and it is a wall panel. You will find it near the other wainscoting and other panel goods.
They come in 4ftx8ft sheets, which in our case posed this problem on a Sunday afternoon.....

Gage was not willing to leave Lowes without his wall. So we crammed it in my small SUV, and I crouched down, and drove the 2 miles home. It was horrible!! I could see fine, but I felt like I was 4 feet tall.
Thank goodness for tinted windows.... hahaha... I can only imagine what this looked like from the outside. But do you see how thrilled he is?? He thought it was pretty funny that I had to drive this way.
Next step was to measure the wall, and make the cuts necessary to make it fit nice and snug. For this I used my jig-saw. About 2 cuts into it, the hubby came home, and said "here I'll do it" -insert Tim Allen's "arh arh arh" He was thinking he was one step ahead of my game, with his big bad guns.

Truth is, this wife got the last laugh. Shh.. he was pretty upset so I didn't rub it in too bad. This is what it looked like.... Oops... I guess the Mag77 Skill Saw was too much power?? hmm... sounding more and more like Tim Allen. Ha!

Here is what it should look like.... nice and snug! So, I repeat, USE A JIG SAW!!! I also used a metal cutting blade because it has finer teeth for a cleaner cut.

Once you know your pieces are going to fit, nail them up with your nail gun. You can use liquid nails if you don't care about the horrid removal process in the future. Just sayin'........
That's it!! It was so simple even my husband could do it.... ok I am only kidding. He is an AMAZING handyman, and has done so much around the house. So I better be nice if I want him to ever do more.

After we installed the panels we went back and fixed the errors, and any seams we needed to hide by using Black latex caulking. Worked like a charm, and you can not see anything.

Around the entire brick paneling where it meets the walls we added a small corner round trim that was painted white. It gave it the perfect finishing touch.
Cost:
Brick Wall $28.00 per Sheet (we used two)
Black Caulking $4.29
Nails, Already had
Corner Round $0.32/Foot (we used 25 feet)
Total Cost :$68.29

There you have it. Easy as pie! If you do this in your own home, send me a link or some pictures. I would love to see it.
Don't forget to check out all of the places I like to party these days, by clicking here.
Thanks for stopping by!!

14 comments:
Love this. I want a brick wall in my house. Hubby won't go for it though:/ I love how it turned out though :)
Looks just beautiful!
I would love if you stopped by to link this up to my Creative inspirations party happening now! I would love to have you there!
Stacey of Embracing Change
http://staceyembracingchange.blogspot.com
Wow, it looks awesome. Thanks for sharing all the details!
I was really curious about the brick wall, so I'm glad you shared the tutorial. Who knew you could buy it in sheets?! Awesome!
wow. so cool. i would LOVE for you to link this post or any other posts you want to my weekend link party http://lovenotesbylauryn.blogspot.com/2012/04/spread-love-link-party-6.html it opens at midnight tonight, hope to see you there!
{love} lauryn @ lovenotesbylauryn.blogspot.com
It looks great! I love a brick wall in a room!
Wow you did an incredible job on this. Thank you for sharing at this week's BFF Open House.
This is great! This product (or something like it) was very popular back when I was a kid--it was called "Z-Brick." It fell out of popularity just like cheap wood paneling. But as an accent wall in an industrial-style bedroom? It's brilliant! :)
Thanks so much for joining Grace at Home! I really appreciate it.
I had no idea you could get those from Lowes! I would love a brick wall or a reclaimed wood wall in my house but my hubby would never go for that - maybe this is a good compromise! I love the way it turned out.
It looks great! And I love the unmade bed!
LOVE this!! My husband and I just rented a tiny apartment in Cambridge, Massachusetts with zero architectural interest and so I think this is a great idea! I might try and paint mine white just to keep the space airy and bright. :)
Megan
www.thenolaruth.com
Of course, something as great as this would become popular! Real bricks walls are really expensive and scream old mansions and history. So I guess people would love a touch of that history in their modern homes too, especially if they are as inexpensive as these sheets. You did great with your brick wall, by the way. =)
Regards,
Rodney Orton
Hi
I completely agree with you. I really like this article. It contains a lot of useful information. I can set up my new idea from this post. It gives in depth information green home construction
I am using Spark wall panels.But i appreciate from your post to use Brick wall panels .thanks for this awesome post.3d wall panels
glass mosaic tiles
Post a Comment
Living life, one thrifty adventure at a time!