Showing posts with label Before and After. Show all posts

Tuesday, October 13, 2015

DIY Built-Ins { Final Reveal }

 This post contains affiliate links
 
 
Earlier this year we finally got around to constructing our Built-In media center in our living room.  To see how we built it click here. 
 
Today I am sharing how we finally finished this amazing project.
 
Here is where we started........
 
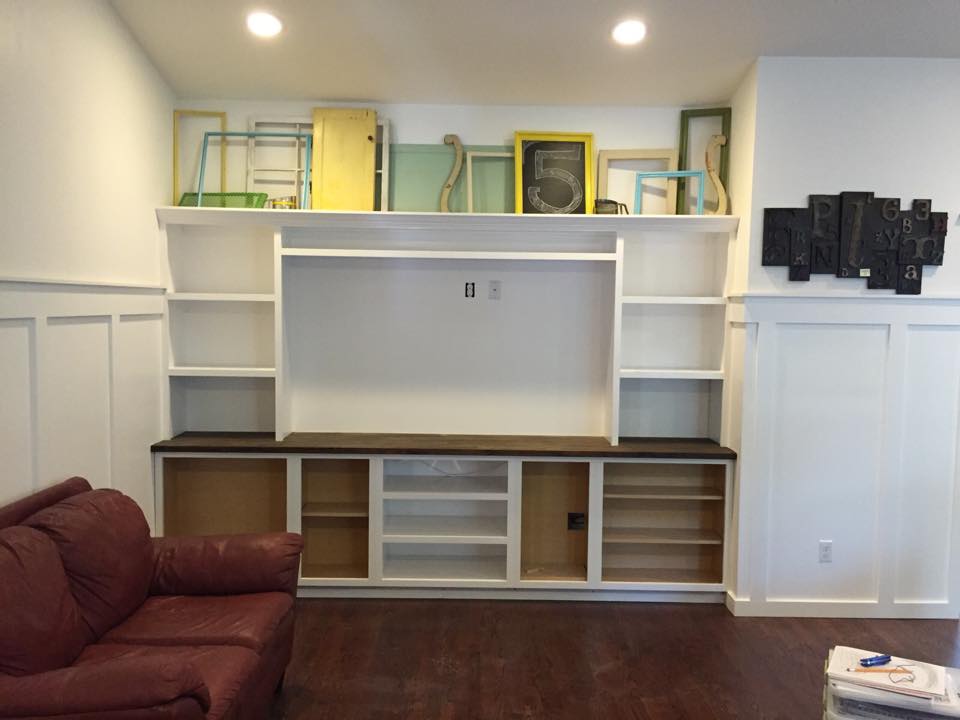
And here is where we left off......
 
It was all about function at the time we built it, and weren't too worried about painting. 
 
In the coming weeks, months and days I have some very exciting news that I cannot share yet, which has prompted the completion of this project.


We started by removing everything from the unit, and taping it all off to prep for paint.
 

We used our small paint sprayer and sprayed this with a synthetic oil based paint that we used in our kitchen remodel that you can read about here.
 
 
This really took no time at all, the taping was probably the hardest part.   Once the painting was complete we had the bright idea to add a new coat of stain to the counter before we put the poly finish on.
 
 
Bad idea.... this went horribly wrong.  The stain bubbled and turned into a chalky mess..... not sure what happened, but it led to a complete re-sand of the countertop.
 
 
Sanding was a disaster, and created a total mess, but it had to happen.
 
 
Once completely sanded down, we applied two new coats of Red Mahogany minwax stain followed by 4 coats of water based polycrylic.  It looks so amazing!!
 
 
We then hung the doors and installed the hardware.
 
 
While the hubby installed the hardware on the doors I played around with some barnwood as an accent wall. 
 
I was lucky enough to score a large amount of salvaged barn wood for free that was being taken out of a project our company had been working on. 
 
Thanks to Debi my amazing friend/customer for thinking of me!!
 
 
I love how the wood ties in with the countertop and the flooring.  And it actually made the room seem larger with the break in all of the white.
 
 
Once everything was done, I started to play around with décor. 
 
I have a love for old globes and have collected many over the years and haven't really found a home for them. 
 
I left one globe up there until I had decided if that was the look I was going for.


In the meantime we found these awesome LED puck lights that have a remote control that were the perfect addition to our built ins. 
 
You can find them here.  They provide a professional look for a fraction of what it would cost to have an electrician hard wire lighting.


I grabbed more décor from around the house and brought out some of my globes.  I loved the simplicity and classic look the gloves provided against the barn wood.
 
Here is the before and after! 


Thank you to my readers for stopping by today.   Don't forget to follow me on Facebook and Pinterest, and you can find me on Instagram and Periscope @OneThriftyChick.

Photobucket


Friday, September 4, 2015

Vintage Military Inspired Boys Bedroom

Welcome back for a quick, fun and cheap bedroom makeover!
 
My 12 year old son is very interested in everything military which is why I decided to direct his room makeover in that direction.  He's also a Nerf gun collector which tied into the military theme nicely.


We only had a couple days to do this project, and it started with his closet makeover you can see here.


For those of you that are new here, this room used to be the master bedroom up until a year ago.  So for a year this boy has been camped out in our old blue room with my white plank wall. Not the worst thing ever,  just not really his style.


The process of this project was pretty basic.  We painted three of the walls white and the plank wall a dark gray color.  On one wall I wanted to create a simple yet classic military design. 
 
 
I started with a level to mark straight lines across the whole wall.  Then using a pencil and a string I found my center point and used it as a compass to create the perfect sized circle.  I used one of my barn stars from my garden fence and traced it for the inside of the circle.
 
 
It was super simple and I did this entire wall in about 1 hour.  I used the perfect ARMY green as an accent color and then painted the center stripe the same gray used on the plank wall and ceiling trim.


For some simple artwork (I didn't have much time to pull this room together) I printed some free vintage military graphics from the internet and mod podge to mount them onto some scrap wood left over from craft club that I had painted black.
 
 
I had two matching black frames in my storage that worked perfect to surround my DIY plaques which made this a completely free design.


Hours before the kids got home I headed to Real Deals Sip and Shop event and grabbed a couple more items to finish off his space. 


I also scored this free desk on craigslist that I knew would be perfect in his room.  I planned to turn it into a night stand and take apart the broken desk part.


With just over an hour left before the kids arrived home, the room was finished! 
 
 
We added the peg board gun storage as seen all over Pinterest, and let me tell you, it's amazing!  He has a vintage military bag that will now be his laundry hamper!
 
 
 He officially has his own teen appropriate space where he can have friends over and enjoy their time in there.  His grandma and grandpa got him this fun convertible couch for his birthday that he can have his guests sleep on when they stay over.  It's been a big hit so far!

 
Well, there you have it!  Quick simple and almost free room makeover!  Visit here to see his 9th Birthday that was Army themed!

Thank you to my readers for stopping by today.   Don't forget to follow me on Facebook and Pinterest, and you can find me on Instagram @OneThriftyChick.

Photobucket


Wednesday, September 2, 2015

Closet Makeover ~ Built-In Guinea Pig Cage

 
This past weekend all 3 of my children were on a 5 day summer trip with their grandparents and cousins. 
 
Many think that the hubby and I would have taken those 5 days and relaxed and enjoyed some quiet time, however we started a project, that led to another project and ended with a BIG project.


Our kids head back to school in one week and we knew we needed to give their rooms a little TLC to get organized for the next 9 months.  Since we built the addition and our oldest son took over our room, we literally left the space un touched. 
 
His bed was moved in along with random furniture, the walls were still the color from where I did this makeover years ago, and he was pretty much camping in our old space.
 
His closet was nothing but a dysfunctional mess to say the least.  Check out what he had going on.
 
 
Chaos is all I see in that closet.  Last year for Christmas his grandparents got him the most amazing guinea pig cage for his fur babies, the only downside is that it takes up WAY too much room.  This was what his room looked like with the cage in the main space.
 
 
I knew something needed to be done to not only organize his space, but to also free up as much room as possible to maximize the function of his bedroom.
 
I'm going to skip the long narrative and give you a run down on how we created this built-in cage.
 
 
First we took out that awful wire shelving....  never again will I install that!
 
 
Using 1x3's we installed a rail along the walls where we wanted the lower level to rest.
 
 
Using 3/4" plywood, we cut a shelf to fit in the space. 
 
 
We needed the extra 4 inches inside the door jamb, which meant notching out the plywood and installing two extra small supports.
 
 
We then did the same above, leaving enough room for the cage below and enough space to hang a mens shirt above.  The top shelf is only 19" deep, just enough to provide storage for clothing.
 
 
Using whiteboard 1x3's we added faces to both shelves.
 
 
During this reno I found this amazing product.  FastPatch 30 by DAP.  It was amazing, and was perfect for quickly filling all the holes and the grooves where the old shelf supports were.
 
 
While this was drying we installed the closet rod support rails that you can barely see in this photo.


Once the joint compound was dry we got right to sanding.  It was a MESS!
 
 
After the wall was sanded we grabbed a can of Homax Spray Wall Texture that dries in 5 minutes and went to town.  Quick and easy!
 
 
Right about the time we started painting, I got a phone call that my sweet grandmother had suffered a heart attack and I needed to get to the hospital, so I left the project for my hubby to take over.  Grandma is doing well, and is expected to make a full recovery.
 
 
I came home to a beautiful white closet that was perfect.
 
 
He took the time to caulk every last bit, not missing a single detail.  He's a keeper!


It was time to move the girls in.  The cage fit perfectly and was exactly what I had wanted.
 
 
We will need to build a set of drawers for the bottom, but we were running against the clock, because this closet project turned into an entire room makeover that I will be sharing with you very soon.
 
 
I am so happy with how this turned out, and look forward to a more spacious and cleaner bedroom.  12 year old boys are not the best at keeping things tidy!


Here is the before and after side by side!  I would say this was a success, and said 12 year old boy agrees.  He loved the surprise when he arrived home from their trip!


Thank you to my readers for stopping by today.   Don't forget to follow me on Facebook and Pinterest, and you can find me on Instagram @OneThriftyChick.

Photobucket