Showing posts with label how-to's. Show all posts

Friday, January 23, 2015

DIY Upholstered Platform Bed {Fit for a Queen}

For Christmas our 9 year old asked Santa for a Queen sized bed, and as you can imagine I quickly realized what this meant.  It meant somehow I would sell her current twin sized bed, Santa would bring her Queen sized mattress (oh and she requested memory foam) and then somehow we would have a bed frame for this said mattress to go on. 
 
Well let me tell you, Santa is one amazing man, and left us with a big picture of the bed, and a delivery slip for a later date so that we had time to "prep" the room.  aka;Mom and Dad needed to build a bed.


While she was at her cousins house, we quickly got started making her an upholstered bed frame using this tutorial. 
 
I wont go into full detail, but I will tell you that it was such a fun and easy project.  We built the base in about 2 hours (including the fabric) and made the headboard the following day in about an hour.


We modified the plans and went with the less expensive 1x3's rather than the 1x4's.  We just added a few more total for added strength.
 
 
I also used regular batting, but did see that you could save some money by using egg crate pads.  I may try this next time.
 
 
We shopped around for legs and really didn't find any that would work and give it the look that we wanted.  This takes a little bit of talent, but was worth it in the end.  This is also part of the tutorial I mentioned above.


Here it is on the first night.  She was coming home and we wanted to make sure it was all ready for her for the night.  She was over the moon excited about her new bed!
 
 
The next day I started working on the headboard and discovered that my fabric wasn't wide enough to cover the size I needed.  So, I took three equal sections and sewed them together to create the perfect size and made it look like it was supposed to be that way.  Worked perfect, I like to call that a happy mistake.


I found the perfect accent color to go with her new bedding and made some buttons  for the tufts.
These are super easy to make, and they really do change the look!
 
 
I used 6 layers of batting for the headboard, and I think it turned out perfect. 


For a short but large project I think it turned out amazing!  I couldn't be happier.  I also used Scotch Guard to seal the fabric to hopefully give it a longer life!
 
 
Thanks so much for stopping by!  Be sure to see where I party each week by clicking here.  And be sure to follow me on Pinterest and Facebook!

Photobucket

Friday, October 5, 2012

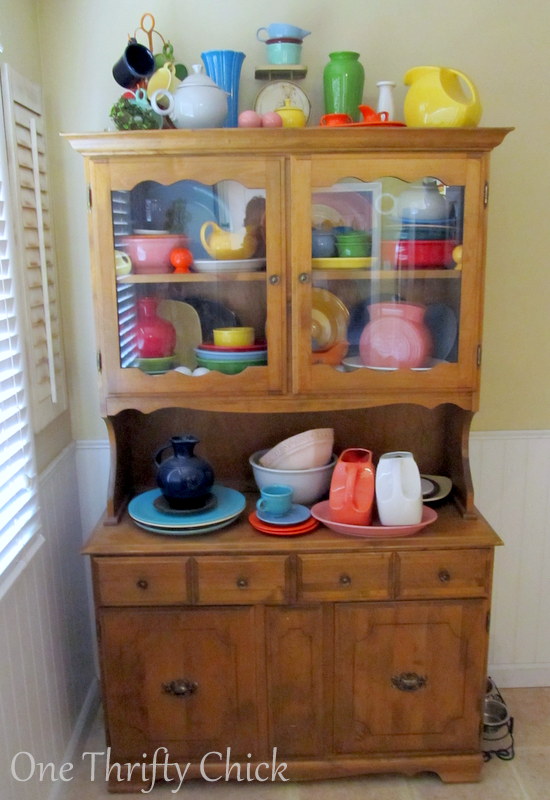
Hutch Makeover {Thrifted Gem}

 It's been about a year since I snagged this beauty  diamond in the rough at my local thrift store!   I brought it into the space in the middle of the winter, so I simply put it to use trying to ignore the "old" factor.

I snagged this baby for $70, but wait! It gets better.... it was on half price special!!  After zero hesitation, I walked ran to the register and screamed... I WANT IT!!!   $35?!?!?   Crazy right?


It sat until I discovered Chalk Paint!  I realized I didn't to tape everything off, and that I could paint it in place!   Score!  So this past weekend I got to work. 

First to start clearing it out.

Which left heaps of very pretty and colorful dishes on my kitchen table.   I could stare at them forever, but let's move on....

I did bring in my painters tarp to protect my flooring.  But I will be honest, I can't stand that floor and am anxiously awaiting the day we get to rip in out. 

And I got to work painting.  I used my DIY Chalk Paint recipe, along with Behr Creamy White flat paint.  It took me 2 coats to get the coverage I was after.  I finished it off with Annie Sloan clear wax.

I left the back blank for a reason... onto that in a minute. When choosing the color I was really wanting to go with a fun color to pop against my walls.  

But being that I am a Fiestaware collecting fool, I chose white so that my dishes were the "pop" of color.   However I did not want a plain old boring white nothing to it hutch.... thus leading us to the next step!

CON-TACT Paper!!!!   I found some amazing choices of this fun self adhesive shelf liner, but went with a more classic approach.  Also a neutral color to help with the fore mentioned "pop" of color.

Here she is!  I chose to keep the original hardware to give it the shabby appeal.  


Check out the POP!!!  :)  I'm loving every.single.detail on this piece!


It was a quick post, but I truly want to thank you for stopping by!!!   Don't forget to check out all of the parties I like to link up to by clicking here!
Photobucket

Tuesday, February 15, 2011

Finally a Picture Wall!!!

I have been collecting and collecting things from thrift stores to use on my big fat bare wall! I was dying to try and get away from so much symmetry, and I have been seeing all of the wonderful picture walls pop up in blog land. I did mine a bit different, by adding all sorts of elements...

Let me take you on a little tour of the process.

My husband just finished the trim on the back wall of the living room, and gave the entire wall a fresh coat of paint.  He told me I was not allowed to touch the walls or put anything back on them!  HAHAHA Soooo.. I waited until he was at work!!  That's just how this mommy rolls!

Here is the before:


My children had some friends over on Friday for a play date, and us mom's had a play date of our own at the same time.  I was talking to their mom about how I wanted to do this to my wall, and she perked right up, and said "LET'S DO IT" !!!  I was so not prepared and had a moment of fear thinking I didn't have everything I needed.... well aparently I shop enough, and had enough stuff stashed.  So we started laying them out on the ground to get the design that we wanted!  I say WE because she was a BIG part of this whole design.  THANK YOU KRISTA!!!

 After it was all laid out, we traced the frames onto some kraft paper and taped them all to the wall.... I was in LOVE.....  This was such a big space to fill, and I really wanted something that filled the space, but wasn't too bulky... does that even make sense? Is this too bulky??  ok moving on....

At about this point my best friend Heather showed up to join in on the fun!  This picture was taken about half way through the hanging party, and we were all squealing with excitement over the results!!  LOVE!!!

This is my "Final" picture for now!  I still have a few changes that will be made, like painting some of the frames, and adding a couple more pieces (notice the paper still on there?)  I am not hooked on the gold frames, but Krista is trying to get me to keep them!  Once I get it 100% completed, I will come back with some close up photos of whats on this wall!

Thanks for stopping by!  Leave me some comment love if you have any ideas for my wall!!!

I am linking to the following parties:


giveaways

Catch a Glimpse Button

Saturday, January 29, 2011

Furniture Grippers & Update!!

As most of you know by know, I am living the dream of a circus ring leader at this moment in life. To give you an update, we got the kitchen faucet (i bought a cheapo) installed and had water for about 10 minutes, and then we started on the shower..... So I currently have NO water at all, which means no baths, no potty and no cooking... which the cooking isn't a big deal because I still have NO stove and NO Dishwasher to wash the dishes that we can't use anyway.....

OK, enough on that rant!!

Yesterday while we patiently waited for our plumber friend to arrive I decided to get the grippers on the new furniture. 2 years ago when we refinished the original wood floors, we bought rubber bumper feet for our furniture. Over time (about 6 months) they wore down so far that the screws were exposed, and we had no idea. Until, I moved the couch to clean, and discovered this:
How sad was I?!?!?!?!? So, yes it still looks like that until we get the sander, stain, and poly out to fix it. Luckily it is hidden under the furniture......
So, now what? It is a pet peeve of mine to have the furniture moving around the room with 3 kids, ALL the time!! My best friend had the idea to use shelf liner!! Here is what you need for this project: (slurpee is optional, but a must for me!!!)
Remove the existing feet from the furniture so that you have a flat surface to adhere to
Cut your first square to fit the bottom of the foot
Sorry for the blurry pic, but then you will want to use that first square as a template for the rest. Cut all of your squares at once, it makes life easier, trust me!!
Then grab that trusty glue gun and start gluing! I did use a popsicle stick to press them down (not shown) so that I would not get as many burns.. yes I said as many.... I always burn myself!!
Walla! Here is what it looks like finished!
And here is how my furniture is placed and will now stay thanks to a best friend and a $5 roll of shelf liner!! Yea baby!!

Over time these will get dusty & dirty and will start to slide... I change mine about once a year or so. And these suckers make it hard to move the funiture, which is AWESOME in my kiddie land life!!
Thanks for stopping by! I hope to be back soon with some final updates on the circus performance!!!
Mondays Tips & Tricks party with Homebody

UndertheTableandDreaming


giveaways