Tuesday, October 26, 2010

My Favorite Room Before & After

Welcome to my Blog! I must start by saying that I do not have an "Official" before picture, but with good reason! My husband and I decided that we were going to remodel the garage in our home that would include a Laundry room (I've always hated doing laundry in the garage) and a Playroom! Well to my suprise I came home from work one day and he had already started the building without me knowing. I didn't know why, but I was not going to complain! So I grabbed my camera and started from here:


In this picture you will notice the Garage door still in the photo, along with the opener...


This is what I had envisioned for the playroom. A big room that had the ability to have an open door for fresh air in the summertime... WRONG! He told me this was going to by MY room! His exact words were "The kids have their own rooms with plenty of toys, and I want this to be a place for you!" I know how sweet right? I was on cloud 9!!


Well as we started moving along, I had NO clue what colors I wanted because I had no time to really plan for this! I wanted another baby, but we had decided that our two plus raising our nephew was really all we could handle while working full time... and my son had a Curious George nursery that I was ooober in love with and kept EVERYTHING from. So I decided that since I can't have more babies, I would make this my "baby" room, but for ME! Bright YELLOW!! It keeps you awake in there, trust me!!This is the door that leads you into the laundry room to the right, and into the stockpile through the door on the left! (and yes, that is my daughter in her undies with a paint roller. She was helping paint the laundry room)


Here is my finished product!! My hubby built all of the workspaces and the shelves on the left wall. Everything else was purchased at Michaels craft store! I love it, and I am not even completely done making it my space!


Just a couple of my storage spaces:


So here it is:


BEFORE..............


AFTER........


I am linking up to the CSI Party HERE !!! Hope you enjoyed my room!

Halloween Survival Kit's for Teacher Gifts!!

So this year I decided I wanted to get a little more creative with my teacher gifts, so here is what I have come up with! And first and foremost I could not have pulled this off at the last minute without my Bestie Heather AGAIN!!)

Here are the items I started with, and being as thrifty as I am, I must tell you what I paid for these. Mini first aid kits, cough drops, itch sticks and shout wipes (not pictured) were all FREE using coupons. I paid $0.25 for the Purell to go and $0.01 for the pencil box both during the back to school sales at Office Depot. I also purchased some advil to go for $0.97 each and added them later, along with a couple Hershey kisses. (I paid retail for those.... shh!)
I took all of the first aid kit contents out and placed them into the box along with all of the other items. Then Heather helped me assemble the tags using cardstock, my Cuttlebug embossing folders, ink, stamps and some ribbon, and here is what they look like.

Inside:

Outside all complete and ready to go. (do you love how the Purell matches the box?) that is why I bought them and I had NO idea what I was going to use them for, but I knew for $0.11 for the set that I HAD to have them!!
OK, so for the cutest part... this is what is on a typed note inside the box (not shown)

On Halloween it's all about Trick or Treat,
but in the end most Teachers are just plain Beat!
I'm giving you this Halloween survival kit,
and I'm pretty sure it will be a big hit!

Kit Includes:
First Aid Supplies - For Vampire Kisses
Itch Stick - For Spider Bites
Hand Sanitizer - To prevent Zombie Virus
Cough Drops - To Soothe a sore throat from screaming
Advil - To cure a Witch's Brew hangover
Chocolate - Because every great teacher needs a little chocolate in her life!

HAPPY HALLOWEEN!!

The kids have 3 teachers, plus we always give past teachers one too, so we made a total of 4 of these.... two of each color! And If I must say so myself they came out fabulous!!

I am linking up with Somewhat Simple here !!
I am also linking up with Sawdust & Paper Scraps here !!

Friday, October 8, 2010

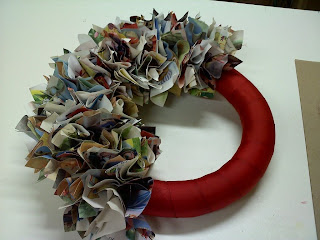
Childrens Book Wreath!

Can I just start by saying that I LOVE this wreath!! I have been thinking about doing this for some time, and thought I would just stop thinking and start it!! This is a gift for the most wonderful teacher Ashley. (Heather, you don't count, you are awesome too)

Warning: If you are a librarian, please turn away now.


I started with the wreath foam from the dollar tree, glue gun, childrens books ($0.49 each at the thrift store) and ribbon (not pictured.) I later added some grungeboard letter and ink from my craft stash.

I cut the pages out of the book, and into 4x3 inch squares.

I used a pen to form the paper into the shape I wanted
Then added some glue and started applying them to the wreath. (this take a LOT of time, so be patient)


Here is the beginning of the process.

Here it is after I added the ribbon.


And WALA! There you have it, a Childrens Book wreath!!
I should also tell you that I got thebook wreath idea from
Thanks for looking!!
I am linking up to the following parties:
somewhatsimple SYS Linky Party
Sawdust & Paper Scraps here !
UndertheTableandDreaming


Thursday, October 7, 2010

"Decrapification" of the scrapbook room!!

Well hello again! It has been the craziest summer, and it shows on my blog!! My goal is to post at least 2 days a week... so we shall see how that goes.....


Ok, now onto business. I have this amazing scrapbook room that Mr.Wonderful built me last year, and over the summer it was a little abused. Ok, let's get real... it was REALLY abused!!

Here is what it looked like last year.


Not too bad, just WAAAYYY too clutter for this OCD crafter!

Ok, so that looks pretty good compared to what you are about to see. I am ashamed to show you this, but in all honesty the only reason it looks the way it does is because I have 3 small children, and this was the only place i could "park" stuff until i put it away. HAHAHA it only took 3 months to put it away!


OK, it's over, I showed you my dirty secret. I have problems, yes I have figured this out. While my Bestie Heather was over to help me clean this room out, we discovered that Ihave about 3 of everything that I dont even need!!


So we spent one night cleaning most of the stuff you see in these pictures out, and then tonight I really went full speed and re-arranged, and re-organized the whole space. I am loving it, and cant wait to start working in there!


OK, so there you have it. And for some reason blogger is being a pain in the butt tonight with the pictures, so I will show you more of how I organized and decorated in another post!
Thanks for checking this out!
I am linking up to the following party for the first time!! YAY!