Showing posts with label Class Treats. Show all posts

Friday, December 4, 2015

Reindeer Dust { A Christmas Tradition }

this post contains affiliate links
 
Reindeer Dust or Food has been one of our longest running Christmas traditions.  We've been making it for 11 years and the kids look forward to it year after year.
 
 
Here is what you will need to make your own:
 
Cricut(optional)
 
This year we created fun embellishments for the tops of the bags by cutting out reindeer with the Cricut using the Jolly Holiday's cartridge.  I cut out 75 reindeer and 75 red scarves.
 
 
While I cut everything out on the Cricut, the kiddos got right to bagging the dust!  You will want to fill each baggie up about 3/4 of the way full (you can use any size bag) and then add 1 Teaspoon of Red and 1 teaspoon of green sugar sprinkles.  We do NOT use glitter since you will be putting this outside where critters can ingest the glitter and can be harmful.


Once all of the reindeer were cut I used Glaze Pens to add a black dot for the eye and red for the sweet little nose.
 
 
Using my Tape Runner I attached the red scarves onto each reindeer.  It seems tedious, but it goes really fast!
 
 
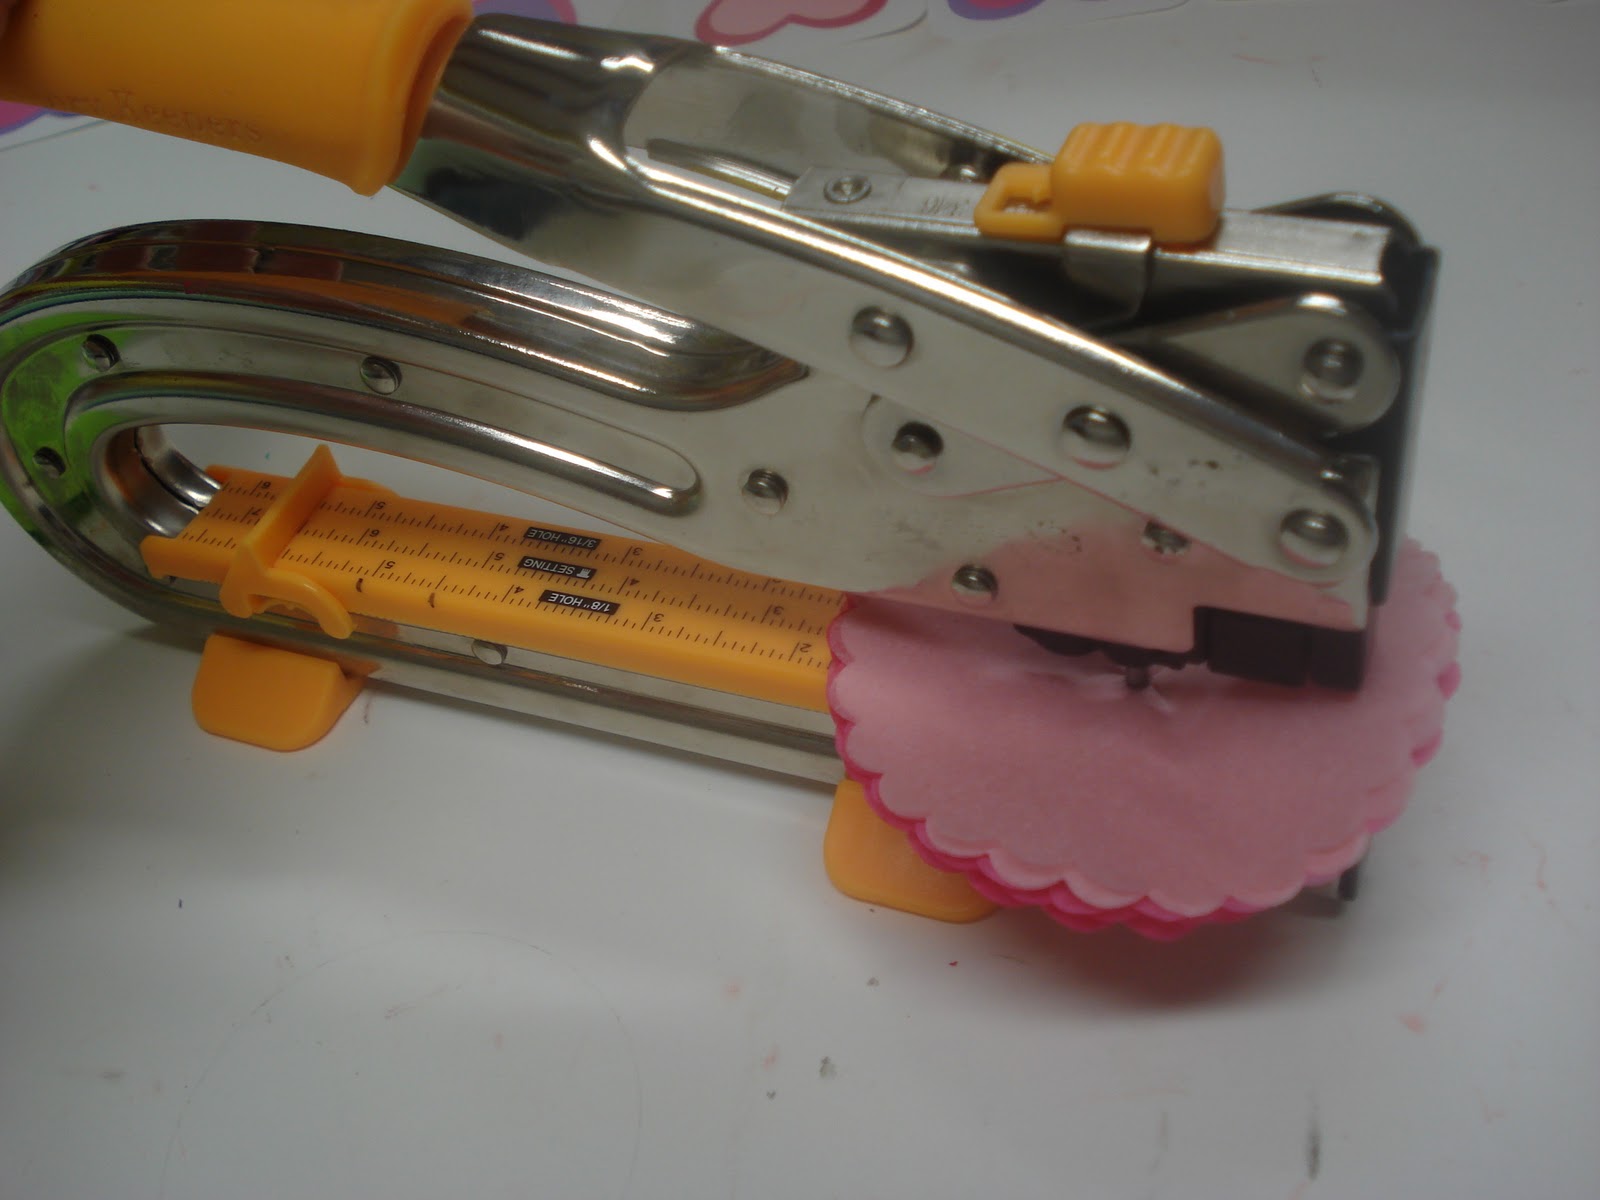
I don't have a picture of this step.  I cut a fancy square on the cricut 4.5"x4.5" (you can use a regular square), folded it in half and stapled it to the top of each bag.  I created a printable in Word to fit my baggies that reads:
 
Just Sprinkle on the lawn at night,
The moon will make it sparkle bright.
As Santa's reindeer fly and roam,
this treat will guide them to your home.
 
You can change it, add to it and add a personal message at the end if you wish!
 
Using my tape running I placed adhesive along the top of my poem and slipped it under the paper topper on the bag.
 
 
And again, using the tape runner I attached the reindeer and then you are DONE!
 
 
These ones were created to match the Winter Wonderland theme for the classroom party in First grade that you can read about here.


Thank you for stopping by today.   Don't forget to follow me on Facebook and Pinterest, and you can find me on Instagram and Periscope @OneThriftyChick and on Twitter @JennJSheffler.


Photobucket

Come Join me weekly at the following Parties:
 
                Mad in Crafts
Wednesday: Gingersnap Crafts,

Sunday, February 19, 2012

Play Dough Valentine's

This post contains affiliate links
 
For the little miss we created Kool-Aid Play-Doh kits!  I used some of the pencil boxes that I picked up over the summer during the back to school sales.  They were $0.01 each!  I grabbed 30 (the limit) and knew I could use them at some point in the future!  You can grab them here on Amazon.

I created a Label using Picnik... sad to see them go!


We took little zip baggies and placed 1/2 cup flour in one, and 1/4 cup Salt in another.  Added one packet of Kool-Aid and a heart shaped cookie cutter and called it good!

The cookie cutters came with wedding invitations on Oriental Trading, but you can also find them on Amazon.

Using my Xyron machine, I created labels with the instructions that I attached to the back.  This worked so well!


  Here is the "slogan" I came up with...... cheesy I know, but this was a hard one!


The night before Valentines day I was frantically trying to get everything finished up and my sweet husband came into the kitchen, placed his hand on my shoulder and said "babe, why don't you put these valentines down, and I will go to the store and get some easier ones, you need to rest"  and of course, I said no way!  I was determined to get these puppies completed.  My daughter did help with most of them, but as usual she lost interest and moved on....

The day after Valentines Day, she came home with this note.  This is a perfect reminder why I do the holiday crafts that I do!!


This is from a little boy's mom from her class.  He is the sweetest boy ever, and is special needs.  Every time I am in the classroom, I see all of the children take to him, and treat him with such love and care.... it melts my heart.  I will admit, I shed a tear when I read this!  I also got an e-mail from another Mom about her valentine as well.  So I had a great Wednesday!!


For Gage I found an awesome Idea via Pinterest, here!  It was so simple using glow sticks and I knew he would love this!  And he did!!


They were so simple, turned out amazing and everyone loved them!!

Moving on to the next item of business.  Classroom parties!  I had to create a Tic Tac Toe game for the 3rd grade classroom.  While I was at work, I just whipped something up real quick in Excel.


If you may be wondering.... the blue and white M&M's were for my son who is no longer allowed to consume Red40 artificial coloring.  He was very happy to be different that day!

These were a big hit for the class party!
 
Thank you for stopping by today.   Don't forget to follow me on Facebook and Pinterest, and you can find me on Instagram and Periscope @OneThriftyChick and on Twitter @JennJSheffler.


Photobucket

Come Join me weekly at the following Parties:
 
                Mad in Crafts
Wednesday: Gingersnap Crafts,


Tuesday, December 20, 2011

Walking in a Winter Wonderland { First Grade Style }

I was asked to help plan the First grade party in my daughters classroom this year, with one very big detail.  NO CHRISTMAS!  Of course this had my brain going for a couple days as far as a theme, and then it came to me!

I would use the party stuff from our carnival party, and make it a "Winter Wonderland" theme!!  Perfect!

And what is so perfect for a Winter Wonderland?  Hot Chocolate!!   Here are a few pictures from the party!  Enjoy!  My Best friend and I designed all of the fun prints for the party as well!


I took these pictures in a rush to be able to make it to the holiday program in the gym.  Two other moms and myself rushed in while the kids were at lunch to decorate and then rushed off to watch all the littles sing in the program!  So please forgive me if the pictures are not too detailed.
This is the "Wonderland Craft" table.  The kids each made a snowflake ornament.  The snowflakes were cut out on the cricut, with each childs photo as the center, and then they glued on silver spray painted puzzle pieces and added a touch of glitter!   They turned out adorable!


And because I am me, I had to deck out the hallway for the kids to walk through when they returned from the program!  They loved it, even Mrs. Backlund!


We set up a quick game using the cans from the carnival party, and turned it into a "snowball toss" by using white wiffle balls!  This was a HUGE hit!!  I also created a big playlist of different artists singing "Winter Wonderland" to stay with the theme and not using the word Christmas.
And to keep our 8 year tradition, we made Magic Reindeer Dust for all of the kids in the class!
  Such a hit!  I used my Cricut Imagine to cut out the top not using My Minds Eye paper, and then used my E2 with the Jolly Holidays cart to cut out the Reindeer.  I then added a red glitter nose and a black eye by hand along with his little red scarf!  Soooo cute!


I hope you enjoyed our little party photos!  The kids had a blast, and so did the parents!

I am linking up to these wonderful blogs:
Thrifty Decorating, Thrifty Thursday
Clean &Scentsible's Creative Spark Party
Gluesticks, Get Your Brag On!


IhookedupwithHoHlamespice

Somewhat Simple

Monday, February 14, 2011

Shamrock Gardens....

UPDATE:  This is one of my first few blog posts, so forgive the amazing photography!
 
Is it really Valentines day already??  Wow, time flies when you are crafting! 

I am going to show you a craft that I came up with last year, and since I didn't have my blog, the pictures really arent that great, so I am apologizing now!  I also do not have step by step picture tutorials, but I will still tell you how to make them!!

Here we go!  This is the finished product!


Materials:
Babyfood Jars
Green Spray paint
Ribbon
Foil garland
Glass rocks (for drainage)
Soil
Hot glue gun
Potting Soil
Shamrock Seeds (you can get these on ebay, the place I ordered them from now has a min. of 12 pkgs)

Step#1 - Clean out the baby food jars and spray paint the lids green. (I used the $1 paint for this project from Wal-Mart)
 
Step #2 - Glue the ribbon around the center of the jar, and glue the garland around just under the neck of the jar.
 
Step #3 - Place the glass rocks in the bottom of each jar.  (i used clear, but you could use green and that would look great too!)
 
OPTION- At this point I moved on to create the poem cards because I had the entire class plant their own gardens.  It made a great class project, but the rest of the directions are as follows.
 
Step#4 - Fill the jars 3/4 of the way full with potting soil. Try to find some with fertilizer, like Miraclegro.... they grow faster! (or Organic)
 
Step#5 - Place 3 seeds in each jar, and top with potting soil, but do not pack them in tightly.
 
Step#6- Mist with water daily (do not over water) and keep in sunlight, and enjoy the luck all year long!
 
That is it!  You are done... and keep in mind that the lids are ONLY used for transport, so make sure the kids know that, or they will not grow.
 
Here is the poem that I wrote, yes it's cheesy, but these were first graders!!! 
 
Shamrock Garden
I am lucky to have you as my friend,
I hope our friendship never ends.
 
I have a special gift for you,
I hope it makes you lucky too.
 
Take it home and watch it grow,
and soon your luck will start to show!
 
Happy St.Patricks Day!
From Your Friend!
 
I hope you enjoyed this post!  It was so much fun coming up with this project, and I cannot wait to think of a new one this year!!
 
 
Be Sure to stop by here and see where I like to party each week!  Thank you for stopping by, come back soon!!


Wednesday, February 2, 2011

Valentine Flowers!


WOW! I am actually getting Valentines done before the 13th of February! 

I may as well admit it now, I am a procrastinator, but that is where my little blog comes in handy!  I am so excited to share these ideas, that it actually forces me to complete them on time!  So here we go.  Its a complete tutorial!

I was inspired by Scrapbooks Etc. I saw the idea on the magazine while I was in line at the grocery store.

 You will need:

Tissue Paper
Suckers
Green Cardstock
2x4 (length may vary)
Green Spray Paint
3" Scallop Punch
Stamp or Stickers
Sm. Hole Punch or Crop-a-dile
Leaf Punch or Cricut/Sillhouette

Step#1- I created the leaves on my gypsy and cut them out on green cardstock using my cricut.


Step#2- I then took my 3" Scallop punch and punched out the petals,  I found it easiest to cut about12 sheets at a time.
Here is what I ended up with (about an hour later)


Step #3- For each flower I used 6 light petals and 6 dark, and then using my crop-a-dile I punched a hole.  You can use a smaller hole punch, but do not use a regular sized punch, it will be too big for the sucker sticks.
 Step #4- Punch holes in each of your leaves.


I had a hard time finding a small enough valentine saying, so I went with some sweet sayings from the $1 bins at the craft store!

Step #5- Stamp your saying on each leaf, making sure your hole is on the left side.

Step #6- Have your husband cut a 2x4 to the desired length you need, and create a template for drill holes.  My holes are 2" apart on all sides.


Step #7- Sand down the rough edges and then spray in the green you choose


Once it has dried, stick in your suckers ad WALLA!!  A not so typical Valentine treat for some sweet little suckers.....  

I absolutely love how they turned out, and hope that my tutorial helps you create these treats too!!

I am linking up to the following parties:

giveaways

"Get Your Brag On" Over at 417 Gluesticks!!

Catch a Glimpse Button


UndertheTableandDreaming