Sunday, July 29, 2012

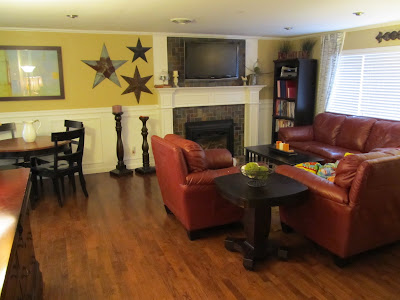
Living Room Reveal {small changes}


I am so excited to finally be able to reveal a little project I have been working on for a few weeks. 

If you follow me on Facebook, then you got to see this reveal picture:

photo-25

My living room has always been the one room that seemed finished.  So why oh why did I go and mess it all up?   Well… I went shopping at my favorite local home décor shop called Real Deals.  All my local readers should go check it out, I PROMISE you will not be dissapointed.  And Jamie the owner is amazing!  Check out her facebook page by clicking here.

Ok… so I was in there one day and saw this set of 3 absolutely adorable lamps.

Pinned Image

  (see the pattern in the sneak peek photo)  I only bought one, because truly, I did not need even one more lamp.  I thought it would look great on my dresser in my bedroom .

So I bought it, got it home and realized it was too tall.  *shaking fist to the sky… I REALLY wanted this lamp!

I had no idea what I was going to do with the lamp,  and was so bummed out.  My girlfriend Heather just happened to mention… “hey, put it in your living room”

My eyes lit up with excitement, as I hauled the lamp out there.  It was like fireworks in my head. I had a vision, and just started to work. The rest is history…. so here you go. 

BEFORE:


AFTER:
photo-26
photo-27

photo-28
photo-31

These are a few entry way photos, and of my finished family command center:

photo-30photo-32photo-34photo-36photo-37photo-38

It’s just so inviting when you open the front door!


Ok back to some of the other details.

This is a group of thrifted candle holders that got a shabby coat of Rustoleum Heirloom White spray paint, with the exception of the green ceramic one.  I grabbed that off of the half price rack at Real Deals… cost me $4.50!

photo-40

These amazing frames and accessories are also from Real Deals…  I am telling you, stop what you are doing and run over there.  Wait!!  Finish reading this first, please!

photo-41

I found this old window, the shelf and jars all at thrift stores, and then scored the adorable metal cart at a garage sale for $2!!!   Oh man I was excited, and my husband did not hesitate loading it up either.  He is great!

photo-42photo-43photo-44photo-45

Below my gallery wall is a console table that opens up into a desk.  I never open it up, but I do use it for storage.  On top is where our phone is, and where I keep all of our bills and such.  I recently purchased several items from the Martha Stewart office line, and got myself super organized.

Inside my aqua notebook, I have my menu plan, calendar, bill pay schedule, and my blog planner.  My white “file” box is where I file all paid bills and and other home documents I need to keep.  It’s beauty with a purpose!  Love!

photo-46photo-48

If you noticed in my before pictures, my end tables were the same color as the wood floor.  They are now heirloom white.  They probably made the biggest impact on the room, and I could not be happier.

photo-49

I have also started a collection of white pitchers.  The large one in the back was given to me from my great friend Krista, and the rest were purchased from various thrift stores.  Both of the vintage jars were garage sale finds.

photo-50

I purchased the new white curtains from IKEA, and instantly knew they were perfect for this room.  I sprayed the medallions on the wall in heirloom white.  (are you surprised?)

photo-52photo-53

More goodies on the mantel that I purchased from Real Deals

photo-54photo-55
photo-51

I am in love with all of my thrifty transformations, and the final color scheme of the room.  It is so much brighter, and makes me happy every time I walk into the room.

Thanks so much for stopping by, and don’t forget to check out all of the parties I link up to by clicking here.


Tuesday, July 10, 2012

DIY Rustic Fence Backdrop {Tutorial}

 
Another ARMY post, are you tired of them yet?
When I was planning the design I knew I was going to need a backdrop of some sort.  I started racking my brain. 

I thought about burlap, then chain link fence, and then it hit me.  Use the old fence boards stacked on the side of the house!


IMG_1319

It was just what I was wanting.  So I started gathering supplies and put them on the deck where I planned on building my wall.

I used about 18 fence boards, 2 furring strips, and a bunch of wood screws. 

 The boards were all super gross and dirty, and some started breaking as I screwed them in.  But to me this adds character.

photo-22


I laid my furring strips parallel on the deck, and used a 2x4 along the bottom to insure a straight edge.  Then I just started screwing them on.  Each board took 2 screws.


photo-23

Here it is all put together.


photo-1

Once it was all put together, I sprayed it down with the hose, and started scrubbing to wash off some of the gunk.


photo-20


photo-2

Once I finished, I propped it up against my garden fence to dry.  I left it there for about 2 days.  It was nice and dry, and ready to use!


photo-21

It was exactly what I wanted!  Now that the party is over, I have this fence panel sitting in my back yard. 

I know I will come up with something to use it on, but for now, it’s part of the kids’ fort.


IMG_1329

Thanks for stopping by!  Be sure and check out all of the places I like to link up to by clicking here.

Friday, July 6, 2012

DIY MRE Meal Kits {Free Printable}


Today I am sharing a little detail from my sons ARMY party.  Today’s post is all about the food.

IMG_1320

When you think of ARMY what food do you think of?  I know I think of those brown paper package’s dropped from the sky.  The real term for them is an MRE - Meal Ready to Eat.
 

All you do is add water and you have a delightful meal. I thought for the party I could order some online (link above), but I also thought the kids really might not like what’s inside.

So what does this crafty mom do?  Design my own!  Ok, well I found the design I wanted, and then handed it over to my trusty best friend to do her graphic design magic.  Yes, truly magic!!

photo-24

She found the most perfect fonts, and created these in no time.

I had her design two, one that says Ham, and one that says Turkey.

I found the perfect brown food Box on Amazon.

Inside the Boxes I created perfect meal kits for growing 9 year old boys.

Build your own sandwiches.  Each kit had 2 slices of bread, one slice of cheese, and two slices of meat.  Each in their own baggies to prevent soggy bread.  As for condiments I purchased individual packets of mayonnaise (Kraft Real Mayo)and mustard (Heinz Mild Mustard) .

IMG_1321

Each kit also got a squeeze applesauce, granola bar, bag of chips and a Wet Ones!  It was the perfect combo for the boot campers!

IMG_1366

With the warm weather and these active boys, I made the call to serve ice cold water.  Now, not just plain old water, but ARMY water.   What’s ARMY water you ask??

IMG_1322

ARMY water is nothing other than old fashioned tap water (we have excellent water here in Oregon) served in an authentic military Canteen !!

IMG_1323

These were a HUGE hit!  I chose to use a sharpie to write names, rather than a label, due to the fact that I knew they would get pretty wet and gross during the course of the day.

Here is the best part of this post!  I have the printable MRE labels available for FREE!!   You can use them with the Avery labels ???? or full sheet labels and just cut them out.

All you need to do is click on the link below, and print!!


You can also check out my post for DIY Screen printing and see how I made their army shirts. And also check out the full ARMY party.

Thank you to my readers for stopping by today.   Don't forget to follow me on Facebook and Pinterest, and you can find me on Instagram and Periscope @OneThriftyChick and on Twitter @JennJSheffler.


Photobucket


Come Join me weekly at the following Parties:

 
                Mad in Crafts
Wednesday: Gingersnap Crafts,

Sunday, July 1, 2012

DIY Screen Printing

This post contains affiliate links

As part of my sons ARMY birthday party I wanted to create some special items for each of the kids to take home as party favors.

IMG_1312

I knew the ARMY shirts were a must for this occasion.  I used the DIY screen printing method,using Freezer Paper .

You will need:
 
Craft cutter (Cricut)(or you can draw your own, and use an X-Acto #2 Knife to cut it out)

I started by using my Gypsy (now you can use Cricut Design Space) to create the design I was wanting.  Remember that you will need to flip the design, this is called a mirror image.

photo-18

Next I cut my Freezer Paper into 12x12 sheets to fit on my Cricut Cutting Mat .

photo-4

You will need to place your Freezer Paper on the mat paper side down.  Which means the shiny side will face up.

photo-17

Once your design is cut, you will remove it from the mat, being careful that you don’t tear your design.   Do not throw any of the pieces out, keep them all!!  Trust me!!


photo-16

This is what you should be left with on the mat.  You have now  created your stencil.  

photo-3

Lay your T-Shirt out on the ironing board, and then place your stencil (shiny side down) in the place you would like the screen printing to be. 

Using your Mini Crafting Iron , carefully press onto the design.  It will lightly adhere to the shirt.

photo-4

You will then need to grab any of the smaller pieces of your design to complete the centers. (not everyone will have this.)

photo-3

Carefully iron those on.  Then using your Mini Crafting Iron , go over the entire design to insure a good seal on all edges.

photo-14

MOST IMPORTANT DETAIL:   Place a piece of cardboard inside of the T-shirt.  If you do not, your paint will go through to the back of the shirt.  Not good friends, not good! 


photo-6


photo-10

You are now ready to apply the paint.  I used Tulip Fabric Paint in Black , found on Amazon or at any craft store.  It works great, and is washable. 

photo-13

Using a Foam Brush , you will dab light amounts onto the shirt inside the stencil area.  Be careful not to brush too hard, or you will tear and lift your design.  

I find it best to brush (if you have to) away from the edges.  Just be careful!

photo-12

Once you have applied paint over the entire design, you are ready to remove the stencil.  Do not wait for it to dry.  Again, just be careful.

You can leave the shirt laying flat, or hand it to dry.  You will want it to dry for at least 12 hours.

photo-19
 

And there you have it.  Your own T-shirt screen printing.

IMG_1372

You can go check out this entire ARMY birthday party and also check out my FREE DIY MRE Printables for your party.


The Best Machine for DIY Projects


Thank you to my readers for stopping by today.   Don't forget to follow me on Facebook and Pinterest, and you can find me on Instagram, Periscope @OneThriftyChick and on Twitter @JennJSheffler.


Photobucket

Come Join me weekly at the following Parties:
 
                Mad in Crafts
Wednesday: Gingersnap Crafts,